
Welcome! This tutorial will walk you through creating and hosting a professional video conference on your enlighten based video hosted platform. In less than five minutes, you’ll learn how to set up a secure meeting room, invite participants, and share your screen. Whether you’re hosting a business meeting, teaching a class, or connecting with friends, this guide will get you started quickly.
Getting Started: Creating Your Meeting
**Step 1: Access the platform**
1. Open your web browser
2. Type **YourCompany.enlightentech.net** in the address bar
3. Press Enter
**Step 2: Set up your meeting**
Once the page loads, you’ll see a simple meeting creation form.
1. Enter a **meeting name** (choose something descriptive for your participants)
2. Add the **time** for your meeting
3. Add the **date** for your meeting
4. Click the **”Start Meeting”** button
You’ll immediately enter the video conference room.
Understanding Your Role as Administrator
**What you’ll see:** When you’re the first person to enter the meeting, you automatically become the administrator (the host). You’ll notice a small **crown icon** in the upper right corner of your video feed—this indicates your administrator status.
As the administrator, you have special controls that regular participants don’t have, including the ability to set passwords, manage participants, and control screen sharing.
Accessing the Control Menu
All of your meeting controls are located in one convenient menu.
**How to access it:**
1. Look at the **bottom of your screen**
2. Find the **three-dot icon** (⋯)
3. Click on it to open the Control Menu
See Image
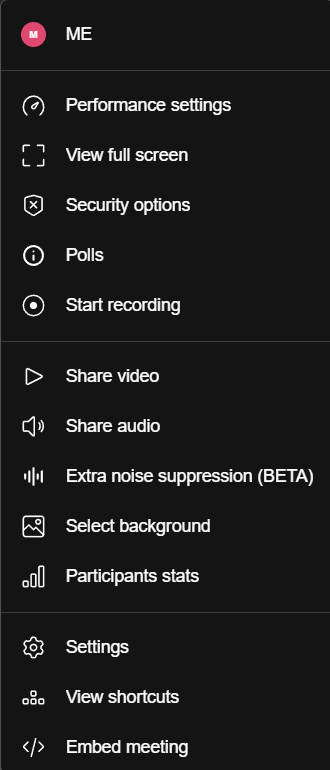
This menu displays all the options available for managing your video conference.
## Setting Up Security: Password Protection
**Why this matters:** Setting a password prevents uninvited guests from joining your meeting and gives you control over who can access your room.
**Steps to set a password:**
1. In the control menu, click **”Security Options”**
2. A security options menu will appear with several choices:
– **Top option:** Creates a lobby (adds an extra layer of security by requiring you to admit each participant)
– **Middle option:** Allows you to create a custom password
3. Enter your desired password in the middle section
4. (Optional) Enable the lobby feature for additional security
5. Click **”Add”** to activate the password
Your room is now password-protected.
Customizing Your Display Settings
**Step 1: Change your display name**
1. In the control menu, click on **”Me”** (located at the top)
2. This opens the settings area
3. Find the **name field** and type your preferred display name (for example, “Enlighten”)
See Image
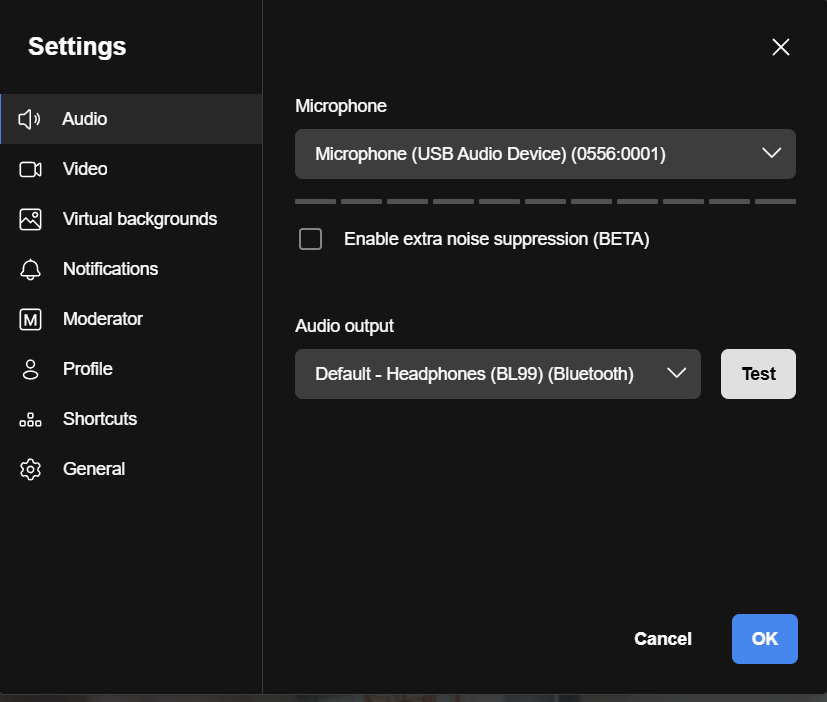
**Step 2: Enable moderator controls**
Still in the settings area:
1. Locate the **”Moderator”** option
2. Enable **”Follow Me”** mode
**What this does:** Follow Me forces participants to see exactly what you’re presenting. This becomes especially important during screen sharing, as it ensures everyone stays synchronized with your presentation.
3. Click **”OK”** to save your settings
Inviting Participants to Your Meeting
Once your meeting is set up, you’ll want to invite others to join.
**Steps to invite people:**
1. Click the **icon person plus** at the bottom of the screen
2. Select **”Invite People”** (second option from the top)
3. A pop-up window appears with several invitation options
**The easiest method (recommended):**
1. Look at the **top option** in the pop-up—this is your meeting link
2. Click **”Copy Link”**
3. Open your email application
4. **Paste the link** into an email message
5. Add any additional meeting details (password, time, agenda)
6. **Send the email** to your invited guests
Your guests can simply click the link to join your meeting.
Using Audio and Video Controls
At the bottom of your screen, you’ll see a control bar with several icons. Let’s review them from left to right:
**Audio control (far left):**
– Click to **mute/unmute** your microphone
– Icon shows whether your mic is active or muted
**Video control (second from left):**
– Click to **turn your camera on/off**
– Click again to toggle back
These controls allow you to quickly manage your audio and video during the meeting.
Screen Sharing: Showing Your Content
Screen sharing is essential for presentations, tutorials, and collaborative work. Here’s how to use it:
**Step 1: Activate screen share**
1. In the bottom control bar, click the **third icon from the left** (screen share button)
2. A pop-up menu will appear with sharing options
**Step 2: Choose what to share**
You’ll see two main options:
– **Entire screen:** Shares everything on your monitor (not recommended for privacy)
– **Window:** Shares only a specific application or browser tab (recommended)
**Step 3: Select your window**
1. Click on **”Window”**
2. You’ll see thumbnails of all open programs and browser tabs
3. Click on the **specific window** you want to share (for example, a browser window you’ve already prepared)
**What happens next:** The screen share activates immediately, and your selected window appears in the main conference area.
**Step 4: Managing your screen share**
While screen sharing is active:
– Your shared content displays in the center/left portion of the screen
– A **control menu appears at the bottom** with a “Stop Screen Share” button
– Click this button whenever you want to **return to standard video view**
**What participants see:** When you’re screen sharing, participants see your shared content on the left/center of their screen, with a column of video feeds (including yours) on the far right side.
Conclusion
You now know how to create a secure video conference, customize your settings, share your screen, and invite participants—all in under five minutes. The e-sdn.com platform makes it easy to host professional meetings without complicated setup.
Thank you for following this tutorial!


0 Comments